![Featured image of post [IoT] Raspberry Pi Pico Lighting Up the Display](/en/posts/2022031210/cover_huf81c1b47938dc1cd2a121eaf50d410a8_42995_800x0_resize_q75_box.jpg)
- A craftsman must sharpen his tools to do his work well. First, let’s configure our development environment.
- Refer to the official TinyGo IDE integration guide: https://tinygo.org/docs/guides/ide-integration/
- Using GoLand 2021 as our IDE, follow these steps:
- Install the TinyGo plugin: JetBrains Plugin Repository or search directly in
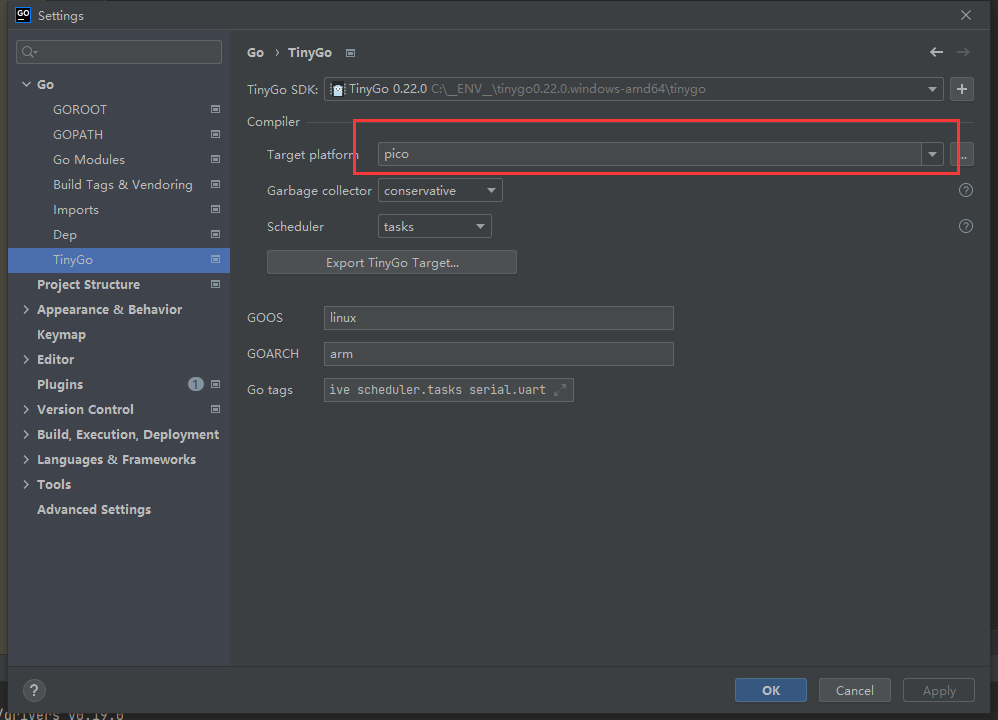
File -> Settings -> Plugins - After installation, configure the board type at
File -> Settings -> Go -> TinyGo(select “pico” in this case) - Restart GoLand 2021 to activate Pico-specific code completion
-
The display used in this project is a 0.96-inch OLED 128x32 module:

0.96-inch OLED Display -
Wiring configuration based on Pico’s default I2C pins:
| Raspberry Pi | Display | Note |
|---|---|---|
| 3V3 | VCC | Power supply |
| GND | GND | Ground |
| GP5 | SCL | Clock line |
| GP4 | SDA | Data line |
- After connecting the wires, verify the display resolution (128x32 in this case).
- Initialize the project:
mkdir display_demo && cd display_demo
go mod init display_demo
- Create
main.gowith the following code (adapted from TinyGo Drivers Example):
package main

import (
	"machine"
	"image/color"
	"time"
	"tinygo.org/x/drivers/ssd1306"
)

func main() {
	machine.I2C0.Configure(machine.I2CConfig{
		Frequency: machine.TWI_FREQ_400KHZ,
		SDA:       machine.I2C0_SDA_PIN,
		SCL:       machine.I2C0_SCL_PIN,
	})

	display := ssd1306.NewI2C(machine.I2C0)
	display.Configure(ssd1306.Config{
		Address: ssd1306.Address_128_32,
		Width:   128,
		Height:  32,
	})

	display.ClearDisplay()

	x, y := int16(0), int16(0)
	deltaX, deltaY := int16(1), int16(1)
	for {
		pixel := display.GetPixel(x, y)
		c := color.RGBA{255, 255, 255, 255}
		if pixel {
			c = color.RGBA{0, 0, 0, 255}
		}
		display.SetPixel(x, y, c)
		display.Display()

		x += deltaX
		y += deltaY

		if x == 0 || x == 127 {
			deltaX = -deltaX
		}
		if y == 0 || y == 31 {
			deltaY = -deltaY
		}
		time.Sleep(1 * time.Millisecond)
	}
}
- Flash the code to Pico:
go mod tidy
tinygo flash -target=pico
- Successful execution will show an animation:
Displaying Text
-
Using font generation tools (configuration shown below):
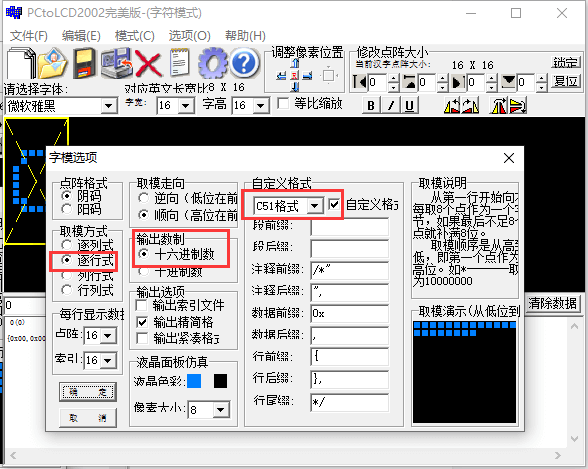
Font Generation Tool -
Modified
main.gofor text display:
package main

import (
	"image/color"
	"machine"
	"time"
	"tinygo.org/x/drivers"
	"tinygo.org/x/drivers/ssd1306"
)

// [...] (Keep the same display initialization code)

var wordData = [][][]byte{
	// Chinese character data arrays
	// (Maintain original byte arrays here)
}

var Key = [8]byte{0x80, 0x40, 0x20, 0x10, 0x08, 0x04, 0x02, 0x01}

func displayText(display drivers.Displayer, x, y int, wordData [][]byte) {
	// Pixel drawing implementation
	// (Maintain original pixel manipulation logic)
}
- Flash the updated code:
go mod tidy
tinygo flash -target=pico
- Final result showing text animation: